Connect ChatGPT (OAuth)
Add your Respira MCP server to ChatGPT as a custom connector by URL with a one-time browser sign-in. No API key to paste, no file to download.
Connect ChatGPT with a browser sign-in
This guide shows you how to add your Respira MCP server to ChatGPT as a custom connector. You add the site by URL, sign in once in your browser, approve the permissions, and the Respira tools appear in ChatGPT. There is no API key to paste and no file to download, and you can disconnect the app at any time.
This path sits alongside the API key and connect-by-link methods. Those still work exactly as before. For Claude Desktop, claude.ai, Cursor, Codex and other clients, see Connect Claude Desktop (OAuth) and MCP Setup.
This is a settings action, not a chat message. You add the connector in ChatGPT's settings. Pasting the URL into a chat will not connect anything.
What you need
- The Respira for WordPress plugin installed and active on the site, on a version that supports OAuth connections.
- A Respira account at respira.press. A free trial works.
- A ChatGPT plan that allows custom connectors (Plus, Pro, Team, Enterprise or Edu). On some plans the connector option lives behind Developer Mode in settings.
Find your site's MCP URL
Your MCP URL is your site address followed by the Respira endpoint:
https://your-site.com/wp-json/respira/v1/mcp
Replace your-site.com with your own WordPress domain. You can also copy the exact URL from your Respira dashboard under MCP Setup, or in WordPress admin under Respira → Setup on the pair an agent step.
Connect, step by step
Step 1: Open ChatGPT settings
In ChatGPT, click your name in the bottom-left corner, then click Settings.
Step 2: Open the connector form
Go to Advanced settings, then click Create app. A window called New App opens.
Step 3: Fill in the New App form
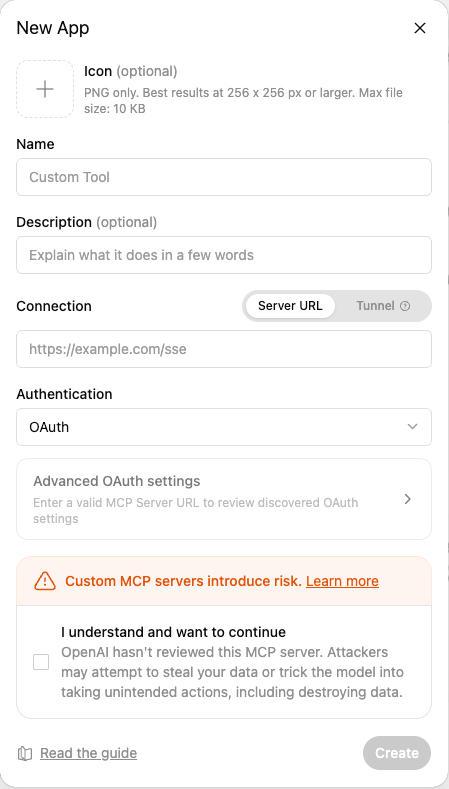
- Icon (optional). Upload an icon if you want one.
- Name. A name for the connector, for example
Respira WordPressorRespira - MaxAd. - Description (optional, recommended). For example:
Connects ChatGPT to my WordPress site through Respira. - Connection. Choose Server URL, then paste your Respira MCP URL into the Server URL field.
- Authentication. Choose OAuth. You normally do not need to fill in the advanced OAuth settings by hand. ChatGPT discovers them from the MCP server URL.
Step 4: Accept the custom-connector warning
ChatGPT shows a warning that custom MCP servers introduce risk. Read it, then check I understand and want to continue. The Create button stays inactive until you check this box.
Step 5: Create the app
Click Create. ChatGPT tries to connect to your Respira MCP server.
Step 6: Approve the connection in Respira
A browser window opens at respira.press. Sign in to your Respira account, then review the consent screen. It shows the app, the target site, the permissions, and your account email. Approve the connection.
Enable only the permissions you actually need. For normal WordPress work, a good starting set lets ChatGPT:
- List pages
- Read pages
- Create drafts
- Duplicate pages
- Work with builder content
- Use approval-based changes
Avoid granting delete or direct live-edit permissions unless you fully understand the risk.
Step 7: Test the connector
Back in ChatGPT, confirm the connection with this prompt:
You are connected to my WordPress site through Respira. Please list my pages and tell me which page builder each one uses.
If everything is working, ChatGPT returns a list of your WordPress pages and shows whether each one uses Divi, Gutenberg, Elementor or another builder.
What access you are granting
The consent screen shows two permission levels:
- Read: read your pages, posts, and site content.
- Write: create and edit pages, posts, and media.
Any per-site limits you set on the connection (a tool allowlist, or approvals required for certain actions) still apply on top of this. The token is bound to the one site you approved. A token issued for site A cannot be used on site B.
A safer way to work: duplicate first
When working on a real, live site, use a duplicate-first workflow:
- Duplicate the live page.
- Make changes on the duplicate.
- Preview the duplicate.
- Approve the changes inside Respira.
This protects the live WordPress site while you work with AI.
Manage or disconnect a connected app
Open Connected apps in your Respira dashboard at respira.press/dashboard/settings/connected-apps. You will see every app you connected by OAuth, the site it can reach, the permissions, and when it was last used. Click Disconnect to revoke an app. It loses access right away, and would need to be authorized again to reconnect.
Troubleshooting
- ChatGPT cannot reach the connector. Make sure the URL is exactly your site address plus
/wp-json/respira/v1/mcp, with no trailing characters. Open that URL in a browser; you should get a short JSON error asking for authorization, not a 404. - The Create button stays grey. You have not checked I understand and want to continue yet. The box is required.
- You do not see Create app. Your plan may keep custom connectors behind Developer Mode. Enable it in settings, or use the API key path instead. See MCP Setup.
- The browser sign-in does not return to ChatGPT. Complete the sign-in and consent in the same browser, then return to ChatGPT. If the window was blocked, allow pop-ups for respira.press and try again.
Thanks to Monnieh Petersen at MaxAd.dk, who wrote the first version of this walkthrough from a live setup.